Executive Summary
While the current Coronavirus pandemic has resulted in strict social distancing measures around the world, financial advisors who are restricted to working from their home offices are finding ways to stay in touch with their clients to continue providing the same level of service, even without the capacity to hold in-person meetings. One way advisors have continued to meet with clients is through videoconferencing – using computer technology and conducting virtual, face-to-face meetings over the internet – with readily available equipment already installed in most modern computer systems, or in some cases purchasing new equipment to create or improve their home office videoconferencing setup. With the caveat that many advisors aren’t necessarily familiar with what the “best” videoconferencing equipment is for conducting professional-looking virtual client meetings!
In this guest post, Bill Winterberg – financial technology consultant and founder of the tech blog FPPad.com – provides a practical overview of some of the technology choices financial advisors need to consider to up their videoconferencing game, from the best cameras and microphones to use, to the ideal lighting and “green screen” background options to ensure that advisors maintain a professional appearance for their clients.
Notably, while most laptop computers have built-in webcams that will prove sufficient for videoconferencing needs, financial advisors can upgrade their equipment by investing in an external USB webcam, such as the Logitech C920 or C922, which allow for more flexible positioning on top of their computer displays or mounted on an external tripod for even more flexibility. Microphones are also often built into laptops and computer monitors, but aren’t often situated for optimal sound quality. As an alternative, headsets (e.g., the inexpensive Logitech H390, or the more sophisticated HyperX Cloud II, or Plantronics Voyager Focus UC) can be used for enhanced audio quality, and available options include both wired USB and Bluetooth-enabled systems. For a less conspicuous headset option, the Bluetooth Plantronics Voyager 5200 headset offers a wireless, compact design and fits around one ear with a small microphone arm for voice detection. Lighting equipment, such as the Fotodiox Pro Flapjack or the Elgato Key lights, can also be used to provide consistent image quality, which can be especially important in low-light settings (or where available light sources may be inconsistent and unpredictable).
Finally, advisors can follow a few simple guidelines to make themselves look their best on-camera and to create a camera-ready workspace. By looking at the camera (instead of the image of the client’s face on the computer screen) and standing instead of sitting during the videoconference meeting, advisors will look more engaged and energetic during the meeting. Also, keeping the area captured by the camera clear of clutter and other distractions will provide for a more professional appearance, making it easier for videoconference participants to focus on the meeting itself. If the nature of the physical space doesn’t allow for convenient modifications (e.g., if the area is in a tight space at home or perhaps in a high-traffic area shared with family members), a room divider or green screen (like the Fotodiox Collapsible Portable Backdrop or the Elgato Collapsible Green Screen) can be helpful to reduce distracting backgrounds. And ideally, be certain the advisor can orient themselves so their back isn’t to an open window (which can result in too much background light that distorts the video image and/or leaves the advisor’s face in shadow).
Ultimately, the main point is that financial advisors can continue to meet with their clients remotely during these turbulent times especially when their clients need their support the most. By setting up some simple, affordable, and easy-to-acquire equipment, advisors can use videoconferencing to maintain their connection with clients in a personal manner, all while working from home.
Today, financial advisors find themselves operating their firms in a strange new world. With the rapid worldwide spread of the coronavirus disease, nations, governments, and municipalities have reacted with unprecedented levels of pandemic response and mitigation techniques. One of the most sweeping approaches to reduce the outbreak of the virus is the enforcement of stay-at-home orders, affecting billions of people around the globe.
In the United States, dozens of states issued stay at home orders for their residents beginning in March 2020 that are in place until April 30, and in some cases, through May or even early June. Because of the speed at which these orders were enacted, financial advisors were forced to adjust their professional operating routines with little, if any, notice.
The closure of all businesses and locations deemed “non-essential” by state governments meant that financial advisors no longer had access to their traditional office space, nor in some cases to the alternative office space identified for use in their business continuity plans. The only viable option for most advisors has been to hunker down at home and conduct as much business as possible from there.
Nevertheless, financial planning remains, and always has been, a relationship-based business, and it is important that advisors be able to maintain effective communication and relationship-building encounters with clients as well as prospects.
Choosing to conduct meetings via video is an individual decision made between an advisor and the client, based on the client’s preferences and what works best for their respective communication styles; however, the current situation has removed the in-person meeting as a viable option, leading advisors to rapidly embrace videoconferencing as a means of maintaining that ‘face-to-face’ connection, engagement, and proactive rapport with their clients.
There are only a few key components financial advisors will need to get up and running with a high-quality videoconferencing setup, including a camera and microphone, and perhaps some basic lighting equipment, depending on the available light in the advisor’s workspace.
Because of the current pandemic situation, though, it’s important to note that some videoconference equipment may be on backorder or sold out through online retailers due to a surge in demand for videoconferencing equipment. Instead of investing in equipment purchases through online sites, advisors may wish to confirm the availability of equipment with their local electronics retailers, many of which are deemed essential businesses and permitted to stay open.
Webcams and Other Video Cameras That Can Meet Videoconferencing Needs For Financial Advisors
The easiest way to get started with videoconferencing is to use a built-in webcam present in most modern laptop computers (as well as in some external monitors). Most built-in webcams are suitable for videoconferencing, as most are capable of capturing video in 720p HD resolution (the minimum video quality level I recommend when communicating with clients in a professional context).
However, most of the software bundled with such built-in webcams (if there even is software available) offers little control of important webcam settings such as focus, white balance, exposure, and more (discussed later).
Depending on the computer, software downloads may be available from the Original Equipment Manufacturer (OEM) to enable control of the webcam settings (i.e., from Dell for a Dell computer, from HP for an HP computer, etc.). Too often, though, the webcam software allows users to select color filters and amusing visual effects but offers no ability to customize the actual webcam settings.
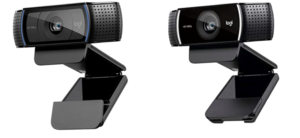
A worthwhile upgrade to the built-in webcam is the purchase an external webcam connected via USB port. Some of the most popular USB webcams are manufactured by Logitech, with the Logitech C920 (MSRP: $79.99) and Logitech C922 (MSRP: $99.99) being the most common choices.
These webcams feature built-in adjustable brackets that allow the camera to be placed directly on top of a laptop or desktop display, or even mounted to an external tripod using the included 1/4” 20-screw thread such as this lightweight tripod from AmazonBasics for under $20. This opens up the ability to locate the webcam in a specific location on your desk or elsewhere for videoconferencing, rather than be tied to the location of built-in webcams at the top of laptop screens and desktop monitor displays.
Both Logitech webcams capture video up to 1080p HD resolution, feature dual built-in omnidirectional microphones (useful for picking up sound from all sides of the microphone), and supports camera setting adjustments through Logitech’s proprietary software (see Camera Settings below).
For those financial advisors who want even better video quality and are comfortable with a bit more complexity in the setup process than a plug-and-play webcam, high-end camera equipment that supports video output via an HDMI connection (e.g., many digital cameras) can be connected to a computer via an external HDMI to USB “capture card” to use the camera as a webcam. While most digital cameras over the last decade support an HDMI output, one easy way to check a camera make and model for a "clean" HDMI signal is to reference this page published by Elgato.
Note that the camera’s video output via the HDMI connections needs to be “clean” in order to do so, which means the camera should not output any on-screen menu icons or status graphics through the HDMI output (or else those settings menus will be displayed to the client via the videoconference meeting!).
Popular capture cards include the Elgato Cam Link 4k (MSRP: $129.99), the Magewell USB Capture HDMI Gen 2 (MSRP: $299.99), and the AJA U-TAP HDMI (MSRP: $345).
Capture cards allow external video cameras to be recognized by most modern computers as a webcam by connecting an HDMI cable from the camera to the capture card, and then either plugging the card or an external USB cable into a USB port on the computer (effectively turning the camera itself into a ‘video input’ device akin to a webcam for the computer).
Before purchasing a capture card, though, be sure to read the specifications for the computer’s minimum required operating system, number of cores, processor speed, and USB bus bandwidth to be sure the computer can support the capture card. The required specifications can be found on the capture card manufacturer’s website, as well as the specifications section of most online retailer websites.
Nerd Note: To find information about your computer’s number of cores and processor speed, search for “Device Specifications” on a PC. On a Mac, click on the Apple icon in the upper-left screen corner and navigate to “About This Mac”, then to the “Support” section, and then to the “Specifications” section. Information about USB ports can be found in “Device Manager” on a PC, and through the “About This Mac” section’s “System Report” or “System Profiler” on a Mac.
With a capture card in use, video conferencing software can use an external camera paired with a professional lens for the best video composition and quality. In addition, the capture card sees what the camera sees, so proficient photographers and videographers will be able to manually set the camera’s focal length, aperture (aka F-stop), shutter speed, ISO, exposure, and white balance.
Note that in most cases, capture cards will support audio signals that are sent over the HDMI connection, but not all video cameras send audio via the HDMI connection unless they are in playback mode, which wouldn’t work for live videoconference purposes. Also, many professional cameras do not come equipped with high-quality internal microphones, so even if audio is captured via an HDMI connection, the audio may not be the best quality in order to host high-quality videoconferences.
Consequently, the advisor may still need a separate audio input (e.g., a microphone, or headset with a mic attached) connected to the computer. Good, high-quality microphones suitable for videoconferencing activities are discussed in the ‘Microphones’ section, below.
Adjusting Webcam Or Camera Settings For Optimal Video Images
Most of the default settings for webcams include auto-focus and auto-exposure (also called ‘gain’) when in use. Unfortunately, both automatic settings can result in distractions in the video image from time to time.
Webcam auto-focus attempts to keep faces in focus while in use, but occasionally the webcam loses the focus and quickly attempts to refocus the image. This results in slight wobbling of the image from time to time and can be distracting for viewers, especially if the wobbling happens frequently (e.g., because the advisor talks in an animated manner and moves enough to cause the camera to continue trying to re-auto-focus).
The webcam auto-exposure can also result in a distracting video image as a person may lean forward or back, changing the amount or intensity of light reflected into the webcam. As the light reflected into the webcam changes, the webcam will attempt to lighten or darken the entire image to maintain a consistent lighting level for the subject in the image.
Unfortunately, these automatic changes in exposure can also be distracting, as even just slight shifts in position in front of the camera can potentially trigger significant shifts in brightness or darkness. Also, changes in external lighting, such as clouds frequently moving in front of the sun, can result in distracting auto-exposure changes.
Whenever possible, learn how to use the software provided by the webcam manufacturer to disable auto-focus, establish a manual exposure setting, and set the white balance of the camera, so the image on the screen appears stable and with natural colors.
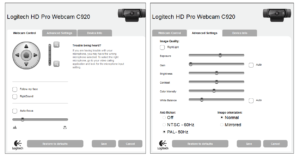
Windows settings for Logitech C920 webcam showing auto-focus, auto gain, and auto white balance as all disabled (i.e., unchecked).
Microphone Choices For Clear Audio During Videoconferences
Half of any videoconferencing experience includes the use of audio (so clients can not only see you but hear you clearly!), so it is important to pay attention to microphones in use to deliver the best experience possible in a video conference client (or team) meeting.
Just like with built-in webcams, laptops and desktop monitors often contain built-in microphones to allow the computer to record and broadcast audio. Once again, built-in microphones are often not located in the best place to pick up audio, or due to size and cost constraints, inexpensive microphone components are installed that result in sound that is limited to a narrow frequency range or mixed with too much echo or background noise present in/near the home office location.
Apple Earbud-Style Options And Sound Quality Issues
Many iPhone owners already own a pair of Apple EarPods that are bundled with the phone purchase, which features earbud-style headphones and a wired microphone attached to one side of the headphones. This construction places the microphone within a few inches of the wearer’s mouth, optimizing the pickup of voice.
iPhone owners can upgrade to the wireless Apple AirPods (MSRP $159 or $249 for AirPods Pro), which also contains a microphone built-in to the wireless earbud. AirPods work well for mobile voice calls and FaceTime chats, but when AirPods are paired to a Mac computer, the recording and playback audio quality drops significantly to mono 8kHz settings (traditional high-fidelity audio extends up to at least 44.1kHz frequencies).
This reduction can be corrected by switching the Mac input device to use the internal microphone on the Mac instead of the AirPods, but that defeats the purpose of wearing the AirPods (which otherwise places a microphone much closer to the side of one’s mouth and not a few feet away embedded in the Mac computer).
Therefore, owners of AirPods will want to explore alternate microphone options, which may take the place of the AirPods altogether for most videoconferencing engagements.
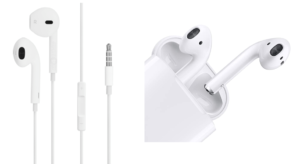
Apple EarPods (left) and Apple AirPods (right)., but AirPods reduce the microphone audio quality significantly when paired with a Mac computer for videoconferencing
USB Headset Options
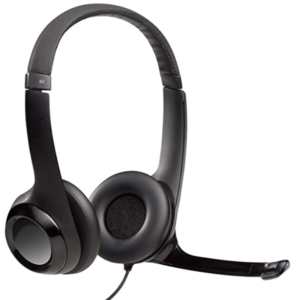
USB headsets are an affordable upgrade to built-in microphones, with nearly all headsets optimized for voice conversations. One of the most popular USB headset options is the Logitech USB Headset H390 (MSRP $29.99), which features an adjustable, noise-canceling microphone and wired volume and mute controls for easy control during use.
One drawback of the Logitech H390 headset is that the design includes on-the-ear headphones. After a full day of back-to-back videoconferences, headset wearers may have sore ears after continuously using the on-the-ear design that presses against the ear cartilage.
For advisors who find themselves booking full days of videoconferencing meetings, consider upgrading to the HyperX Cloud II gaming headset ($99.99) or the wireless Plantronics Voyager Focus UC headset ($299.95). Gaming headsets are built to be used for consecutive hours of use every day by gaming enthusiasts, so they perform well for professionals who often have similar demands when conducting a full day of meetings that require a headset.
The Plantronics Voyager headset is also one of the highest-rated wireless headsets with exceptional build quality and comfort, but because of that, it does come with a much higher MSRP than the other wired USB options.
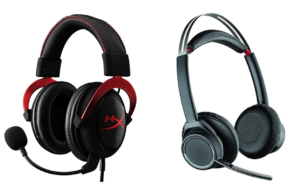
Full days of videoconferencing may call for the HyperX Cloud II (left) or Plantronics Voyager Focus UC (right) headsets known for their comfortable designs
One drawback of full-size USB headsets is the bulky appearance of the equipment in videoconferences, which unfortunately is one of the tradeoffs necessary to maximize reliable equipment performance and comfort for a full day of meetings.
For those seeking a less conspicuous headset option, advisors may consider a wireless Bluetooth headset such as the Plantronics Voyager 5200 (MSRP $119). This headset secures over and around the back of one ear and includes a small microphone arm for voice. The headset is certainly much smaller than the full-size headsets recommended, but advisors should be conscious of the need to keep the Bluetooth headset battery fully charged in anticipation of a long day of meetings, and also expect a few glitches during conversations as the Bluetooth signal may sporadically disconnect and reconnect at any time.
Good Lighting Can Improve Videoconference Image Quality
One of the easiest ways to improve the image quality of a videoconference, other than purchasing a dedicated camera, is by adding proper lighting to the environment.
As a starting point, financial advisors now conducting business from a home office might consider updating the office furniture layout so that the camera in use is pointed away from exterior windows and bright lights.
Advisors should orient their videoconferencing camera so that they themselves are facing an exterior window (i.e., as though they were going to look out the window themselves), rather than sitting in front of a window with their back to it (which often results in a dark image and an overexposed background as the camera struggles to illuminate the darker advisor sitting in front of the bright window background).
If rearranging furniture is not an option, consider adding window blinds or curtains to reduce the amount of light entering from the outside windows behind the advisor.
There certainly are a wide variety of approaches when it comes to lighting for video meetings, so for the sake of simplicity, I will suggest using just one light for videoconferencing engagements, and that is the Fotodiox Pro Flapjack 4” x 11” Dual Color LED edge light (MSRP: $209.95).
The Flapjack design arranges LEDs around the outside of the light, which point to the center of the light’s diffusion material. The bounced light results in an even, soft glow that looks great on camera, but is also easy on the subject’s eyes since the subject isn’t being exposed to light that’s emitted directly from hundreds of LED bulbs.
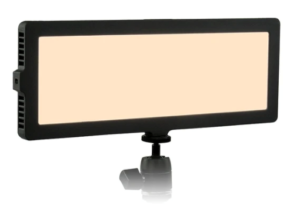
The Fotodiox Flapjack dual-color LED light casts a soft, even glow without being harsh on the subject’s eyes.
The dual-color LED allows advisors to adjust the color temperature of the light from a 3200k amber profile to 5600k white daylight, complementing the light profile that is present in an advisor’s home office.
The Flapjack lights run on either AC power or battery, and the thin, half-inch-deep form factor makes this light easy to locate on a variety of desks. A 1/4” 20 screw thread is present on both the short and long sides of the light, allowing installation in either the horizontal or vertical orientation. For most videoconferencing setups, I recommend attaching this light to a small tripod and positioning it above and to the side of the videoconferencing camera.
Another light similar to the Flapjack is the Elgato Key Light (MSRP: $199) which is popular among gamers and live streamers. The Key Light supports color temperatures from 2900k to 7000k, comes with its own desk-mounted pole and AC adapter, but does not support operation using a battery like the Flapjack.
There are literally thousands of individual lights for sale and hundreds of lighting kits to meet a variety of lighting needs for consumers and professionals alike. Addressing many of the popular configurations is beyond the scope of this article, but I am confident that the Fotodiox Flapjack can be a high-quality and high-performing addition to any advisor’s videoconferencing setup.
Say No To Ring Lights
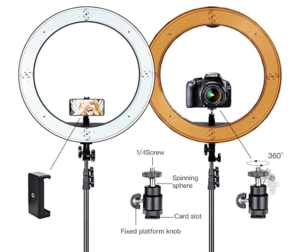
While they’re popular for some YouTube video bloggers and online personalities, I recommend avoiding ring lights for videoconferencing setups.
Ring lights are designed to light objects for product photography or to be used for makeup tutorials. This is because ring lights eliminate all shadows from the object being illuminated, providing an even and ‘thoroughly’ illuminated face.
For human faces and for videoconferencing, though, natural shadows actually help emphasize profiles and expressions, since the three-dimensional nature of a face is still visible.
Using ring lights result in faces with no shadows, which appear flat and two dimensional for videoconferencing. So while great for make-up tutorials and fashion vloggers, ring lights are less than ideal for videoconferencing setups where having clearly visible facial expressions for developing rapport and relationship-building are important.
Customize Videoconference Backdrops By Using Green Screens
One issue encountered by many financial advisors under shelter-in-place orders is the fact that not everyone has a dedicated home office space to conduct videoconference meetings. Advisors are using any and all available spaces to conduct their work while balancing the need of other family members working from home as well as children completing online school assignments.
Sometimes the only available workspace might be a dining table, a small desk in a kitchen, a coffee table in the family room, or even the dresser in a spare or guest bedroom. The background of these locations may be less than ideal to show on videoconferences, so a combination of green screen backdrops or virtual backgrounds in videoconference software can be used to change the background that viewers see.
Green screens allow video software to identify specific shades of green colors, and delete them from the video image output by the software, in a process called chromakeying. The best way to perform chromakeying is to use consistent, even lighting across the entire surface of a green screen, so the software only needs to remove one specific shade of green from the entire video image. This means that a lighting kit often needs to be purchased in addition to a green screen.
Fortunately for videoconferencers, popular programs such as Microsoft Teams and Zoom contain fairly good algorithms to identify unwanted background images and can either blur the background or allow the videoconference user to select an alternate background image (Zoom calls them virtual backgrounds).
For those interested in a portable green screen that isn’t overly large and is easy to set up, I recommend the Fotodiox collapsible 5x7 foot portable backdrop with stand (MSRP: $109.95).
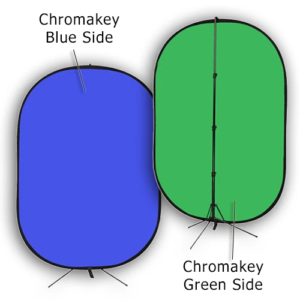
The Fotodiox 5x7 foot blue/green muslin background lets you choose which color works the best for configuring your virtual background.
The collapsible screen folds into a circle roughly two feet in diameter for easy storage and unfolds to a five-by-seven-foot green or blue screen with a rigid edge. The stand has a clip to attach the screen, which can be set up in the vertical or horizontal position without requiring large tripods on either side of the screen or a tall crossbar between two tripods.
Another green screen option is the Elgato collapsible green screen (MSRP: $159) that collapses down into a floor-based case roughly five and a half feet long when not in use. The unit does weigh 20 pounds, so it requires a bit more effort to move and locate than the Fotodiox screen for environments where green screen cannot be used on a permanent basis.
Finally, I would not recommend the chair-mounted green screen panels, as they are located too close to one’s body. This results in the body casting shadows on the screen, which reduce the chromakey algorithm from properly identifying all of the green colors behind the subject on video. Several feet of separation between the green screen and the subject, plus the use of even lighting across the entire screen, results in the best chromakey results.
Again, popular videoconferencing software like Microsoft Teams and Zoom have the ability to form virtual backgrounds, but if those programs are not permitted by the firm’s compliance department, it may be necessary to explore the camera’s software for chromakeying functionality. That means that before starting a videoconference, advisors must first open the webcam’s proprietary software and enable the chromakey option and then return to the videoconferencing software to begin a virtual call.
How Financial Advisors Can Optimize Their Videoconference Environment
In addition to the equipment highlighted above, financial advisors can make a variety of simple changes to their videoconference environment to improve the video experience for all involved. Here are some quick tips that will help advisors get the most out of their videoconference setup:
- Raise the video camera to just above eye level. If using a laptop on a desk, raise the laptop with a stack of large books, a small box, an adjustable/standing desk, or anything that adds to the height of the laptop.
- When using a wired headset, route the wire behind your back, instead of letting it drop in front of your body.
- Check your background for clutter, disorganized items, or other distractions. If your background is a walkway, consider hanging curtains or setting up a room divider to separate the two spaces.
- If there are wall-mounted photos or frames that reflect light into the camera, raise any video lighting in use by a foot or two so the light is reflected below the camera in use.
- If possible, stand up while conducting a videoconference instead of sitting down. Standing allows for more mannerisms, body language, and keeps your energy level higher than sitting.
- Practice starting a screen-sharing session and be familiar with the different options and techniques to share a screen. When sharing the entire desktop, be sure to remember to disable popup notifications to protect confidential information (e.g., “new email” pop-up notifications that may reveal client names or other private details).
- Look at your camera when talking during a videoconference, and not your guest’s image on the screen. If needed, write “Look here and smile” on a Post-it note and position it right next to your camera’s lens.
The coronavirus pandemic of 2020 has dramatically changed how financial advisors interact and engage with clients and prospects. Mandatory stay-at-home orders in over half of the United States have forced advisors to replace in-person meetings with suitable alternatives, including increased phone conversations and the use of videoconferencing.
With the equipment resources and engagement techniques outlined in this article, advisors should have increased confidence that their use of videoconferencing will continue to enhance client relationships by avoiding frustration with audio and video quality during conversations that are critical to the relationship-building process between advisors and their clients.





Great tips, Bill. Do you have any suggestions on how to arrange all of the gear (2 monitors, webcam, external mic, lights, etc.) so that it’s still a functional & ergonomic desk that doesn’t require a lot of assembly for every videoconference?
Also, what’s your opinion of leaving the room background visible vs. the artificial virtual backgrounds?
Great questions Elliott. One option is to look at the Elgato Multi Mount: https://www.elgato.com/en/gaming/multi-mount
You can connect this to your desktop, and then add on the Multi Mount Flex Arm Kit to attach some of the video equipment. Ideally, I’d likely buy two of the Multi Mount arms and figure out a way to suspend a cross bar between the two mounts for more support and rigidity. With two mounts on the desk, I bet I could hold one or two lights, a shotgun microphone, and a webcam. I would not use the Multi Mount to hold monitors, I’d keep those on the desktop or buy a separate dual monitor mount arm. I’d use a clamp like this Manfrotto Pico Clamp to twist on to the Multi Mount and give you a 1/4″ 20-screw for your equipment: https://amzn.to/2ypsrlG
For the background, I do prefer some sort of room background, provided that the space is a home office, a den, or perhaps a space with a bookshelf in the background, as using the virtual backgrounds often results in some video artifacts right around the edge of your body as the chromakey algorithm can’t cut out the background quickly enough as your body moves around. But I know that not everyone has an ideal space in which to host videoconferences, so in that case, using the virtual backgrounds is often a good compromise.
Thanks, Bill!
I actually have found that a ring light, offset to the left and above a C920 webcam, does provide some good illumination if you lower the color temp and brightness. It’s not professional-grade, but I’m not at that level yet. 🙂
Thanks, Bill, for providing, yes, the fancier solutions to the current challenge, but also acknowledging that we can also very much cheap out and use most of the build-in things we already have. I mean, yes, things would likely be better with the better headset, and maybe a better webcam, and a fancy office in the background, but in my experience, clients simply don’t *care* about most of that stuff (well, better said, you can find enough clients who don’t care…the ones who do evidently just don’t work with me) as long as you’re bringing compassion, communication, and the ability to help.
Indeed Meg! That’s why I added that part about the “individual decision made between an advisor and the client” qualifier, because some clients may not care at all about the advisor’s appearance in a video conference! What matters is the quality of the conversation and depth of the relationship. The quality of the video, sound, and lighting is at best a runner-up to that.
Hi Bill
Thanks for the thorough rundown of equipment to make video conferencing work better. I use the Logitech webcam and I have noticed that my picture is usually much clearer than others in big Zoom meetings. Speaking of which, I’d love to hear your thoughts on which video conferencing software is better at meeting the security needs of advisors. Additionally, for clients with hearing disabilities, closed captioning is very helpful. I am wondering if you have found any software that helps with that issue?
Hi Tom, great questions! Let me work with the Kitces team to see if they want a full rundown of the various videoconferencing platforms out there.
For clients with hearing disabilities, I am seeing a few plugins that can perform near real-time closed captioning/voice-to-text updates, most notably used by gaming streamers on Twitch. Those usually have to be compatible with streaming software like OBS (free, open source), but learning how to configure OBS may be overkill for your purposes.
I also see that PowerPoint has enabled live subtitles using Windows native speech to text support. Check out this article to see how you can start a PowerPoint presentation while you are in Zoom, and your Zoom guest can see your captions pop up on top of your PowerPoint slide (the slide could be just one slide with your photo pasted in it):
https://support.microsoft.com/en-ie/office/present-with-real-time-automatic-captions-or-subtitles-in-powerpoint-68d20e49-aec3-456a-939d-34a79e8ddd5f?ui=en-us&rs=en-ie&ad=ie
Let us know if this PowerPoint option works for you!
Thanks, Bill! I’ll try the Powerpoint captioning option.
This was excellent, and fun! Thanks, Bill. I miss seeing your videos and posts.
Thank you Rich! Stay tuned, I am putting some things in place to resume with some new content.
On the Fotodiox light, it looks like it comes with some type of connector but not a stand. Is there a stand you can recommend for both floor and desk? Or two different stands for the two locations?
Correct, the Fotodiox light just has a 1/4″ 20 screw mount on two sides, so a tripod or stand is needed to support it. Up in the article is a link to a lightweight tripod from Amazon Essentials for under $20. If your desk doesn’t have enough space to accommodate a tripod, look at my reply above to Elliott Weir where I linked to the Elgao Multi Mount. This can clamp to most desks and it has a 1/4″ 20 screw on top to mount many lights and other compatible mounting brackets.
Excellent article. Video conferencing can be best conducted using tools like on premise R-HUB HD video conferencing servers, webex, Gomeetnow, Gotomeeting etc. Quality webcams of Logitech (HD Webcams) should be used for effectiveness of video conference.
Love to hear more about software to make better videos. We utilize Zoom and Loom for raw video but what should we use for YouTube creation??
Bill, what would you recommend for an inexpensive yet effective teleprompter (or other solution) to help me do less video editing? I’m open to anything that will let me end up with a higher quality video that I can display on my website.